06 Lesson. Calibration of the magnetometer
Getting raw data for magnetometer calibration
By default, the magnetometer is not calibrated, i.e. it gives inaccurate values. Refined values can be obtained from raw data by calibration, which consists in finding the transformation matrix and the displacement vector. High data from the magnetometer can be obtained by applying the Python code shown below. During data collection, the magnetometer must be randomly rotated, trying to turn it in all possible directions.
Python code:
``cpp raw_data.py def control(): #The main program for which we create remote applications mgn_result = [0,0,0,0] #Analyzing the value of mgn_result num = 1 Magnetometer on(num) #Turn on the magnetometer off(1) for me in the range(500): #Total 500 measurements mgn_result = magnetometer_request_raw(number) if not, then mgn_result[0]: #If the sensor did not return an error message output mgn_result[1], mgn_result[2], mgn_result[3] sleep(0.05) #Screensaver for hundredths of seconds the value of the magnetometer_turn_off parameter(number) #Turning on the magnetometer
### Code in C:
``cpp raw_data.c
#includes <stdio.h>
#include <standard file.h>
invalid control(void) _BOS_ //The main program for which remote applications are created
/*There is no need to declare an array for data output*/
int16_t mdp_result[] = {0, 0, 0, 0}; // Analyzing mgn_result
uint16_t num = 1;
magnetometer_turn_on(num); //Turning on the magnetometer
mSleep(1000);
int i;
for (i = 0; i < 500; i++) //Total 500 changes
{
mgn_result[0] = magnetometer_request_raw(number, &mgn_result[1],&mgn_result[2],&mgn_result[3]);
if(!mgn_result[0]) _BOS_ //If the sensor had not returned an error message
printf("%d, %d, %d\n", mgn_result[1], mgn_result[2], mgn_result[3]);
}
mSleep(50); //Delay of several seconds
}
magnetometer_turn_off(number);
}
``
Combine the BKU with the PSS and the magnetometer as in the trial lesson. Do not attach the magnetometer to the plate so that it is convenient to rotate it. Download the program to Orbicraft and run it. Randomly rotate the magnetometer to collect raw data from all possible directions.
Review the received data in txt format. To do this, select all the results using the keyboard shortcut ctrl+a, then copy using Ctrl+With and save.
## Program operation analysis
**The program uses the following functions for working with a magnetometer:**
`cpp
magnetometer_turn_on(number)
``
– turning on the magnetometer, here is the number – this is the number of the magnetometer.
`cpp
magnetometer_request_raw(number)
``
– a function that returns raw data measured by a magnetometer with the number Num, which is a list of 4 numeric values. Therefore, I believe that we remember while viewing mdp_result consisting of 4 values.
`cpp
mgn_result = [0,0,0,0]
mgn_result = magnetometer_request_raw(number)
``
The first value of the list returns information about the error. If the value is returned **0** then there is no error if **1** then the sensor is not connected if **2** then there is an error in the program.
The program uses the operator loop ** for i in the range(1000)** which will be executed 1000 times, respectively 1000 values will be entered.
These values will be needed in the next lesson when calibrating the magnetometer.
## Analysis of the received data in Excel
Open the data file in Excel. Press Ctrl-O and select the folder with the file. Using Excel, you don't open txt files, just type them into the system* and press Enter to access all the files. Select the data file and click Open.

The import wizard will start. Click Next. On the second page, specify that the column separator character is a space.

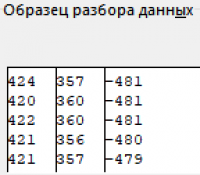
Make sure that in the data parsing sample window, all data columns are separated by vertical lines and click Next.
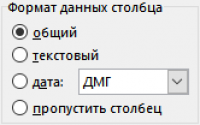
Keep the column data format general. Pay attention to the hardware and device data uploaded to the Excel list.
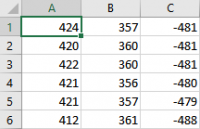
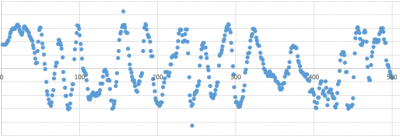
Now you need to build a graph to identify and delete the values that are measured with a large error. On the graph, these values will be out of the general range. Click on the column header to highlight it in its entirety.
Click Insert and select the scatter chart.

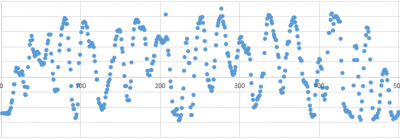
A dot diagram will be built, on which the points that stand out from the general series are clearly visible.

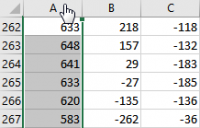
Hover the cursor over the point and see the value.

Find the row with the specified value in the table and delete it entirely. Similarly, remove the erroneous points from the second and third columns.
Read the text. To the question about saving in text format, answer Yes.

Remember where this file is saved, it will be required at the next stage of calibration of the magnetometer.
## Obtaining calibration coefficients
Download the program **Magneto** from the link(https://yadi.sk/d/PYE1AKEkmUa1Kg "Magneto").
Configure and install the Magneto program.
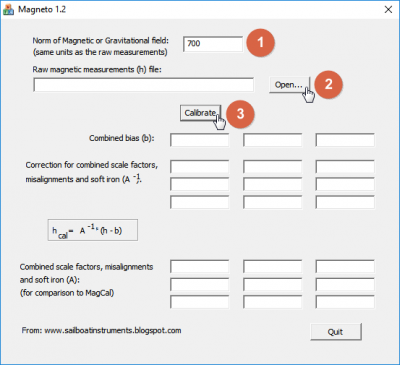
Finally, enter the number 1, the value 700, then click on the Open button and select the file with your data specified on the page. Now it is necessary to perform the calibration. The magnet program calculates and displays the control codes. In the future, not all coefficients calculated by the software installation can be used, but only three values of the combined offset (b) and two correction values for the combined scale coefficients.

## Calibrated magnetometer test
Upload the following program to Orbicraft, which will make 60 measurements in 1-second increments. Use a printed protractor and a magnetometer with a ruler. The codes for determining mag_calibrated are available from Magneto programs.

Copy the rounded values as follows.
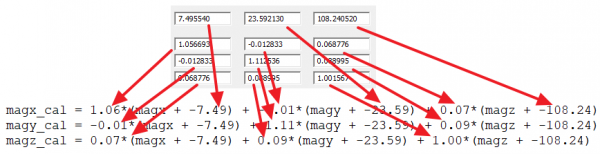
:::Warning
Please note! The three upper normalization coefficients responsible for the zero offset are inserted into the formula with reverse signs, unlike the other coefficients describing the distortion of the ellipsoid.
:::
### Python code:
`cpp
calibr.py
importing mathematics
time_step = 1 # Temporary change step
mag_num = 1 # Magnifier number
# mag_calibrated instruction for use as a magnetometer taking into account calibration coefficients
definition of mag_calibrated(magx,magy,magz):
magx_cal = 1.06*(magx + -7.49) + -0.01*(magy + -23.59) + 0.07*(magz + -108.24)
magy_cal = -0.01*(magx + -7.49) + 1.11*(magy + -23.59) + 0.09*(magz + -108.24)
magz_cal = 0.07*(magz + -7.49) + 0.09*(magz + -23.59) + 1.00*(magz + -108.24)
returns the values magx_cal, magy_cal, magz_cal
def initialize_all():
outputs "Turn on the magnetometer", magn_num
magnetometer_turn_on(mag_num)
standby mode(1)
def switch_off_all():
output "Disable magnetometer",
magnetometer_turn_off(magnesium number)
def control(): # the main programs for which remote applications are created
initialize_all()
mag_state = 0 # Initialize the user status
alpha_goal = 0 # Left angle
omega_goal = 0 # Elevation point of view
for me in the range(60):
# survey of sensors and flywheel
mag_state, magx_raw, magy_raw, magz_raw = magnetometer_request_raw(mag_num)
if not, then mag_state: # if the magnifier returned the ohibki code 0, i.e. no ohibki
magx_cal, magy_cal, magz_cal = mag_alibrated(magx_raw,magy_raw,magz_raw)
mag_alpha = math.atan2(magy_cal, magx_cal)/math.pi*180
print "mag_alpha atan2= ", mag_alpha
elif mag_state == 1:
print "Failure due to access error, check connection"
elif mag_state == 2:
print "Failed due to interface error, check your code"
sleep(time_step)
switch_off_all()
``
### Code in C:
```cpp
calibr.c
#include <stdio.h>
#include <stdint.h>
#include "libschsat.h"
#define LSS_OK 0
#define LSS_ERROR 1
#define LSS_BREAK 2
#include <math.h>
const int time_step = 1;
const uint16_t mag_num = 1;
int mag_calibrated(int16_t *magx, int16_t *magy, int16_t *magz ){
//The mag_calibrated function corrects the magnetometer readings taking into account calibration coefficients
float magx_cal;
magx_cal = 1.06*(*magx + -7.49) + -0.01*(*magy + -23.59) + 0.07*(*magz + -108.24);
float magy_cal;
magy_cal = -0.01*(*magx + -7.49) + 1.11*(*magy + -23.59) + 0.09*(*magz + -108.24);
float magz_cal;
magz_cal = 0.07*(*magx + -7.49) + 0.09*(*magy + -23.59) + 1.00*(*magz + -108.24);
*magx = (int16_t) magx_cal;
*magy = (int16_t) magy_cal;
*magz = (int16_t) magz_cal;
return 0;
}
void initialize_all(){
printf("Enable magnetometer %d\n", mag_num);
magnetometer_turn_on(mag_num);
Sleep(1);
}
void switch_off_all(){
printf("Disable magnetometer %d\n", mag_num);
magnetometer_turn_off(mag_num);
}
int control(){
initialize_all();
int mag_state = 0;
int16_t mgx_cal=0;
int16_t mgy_cal=0;
int16_t mgz_cal=0;
int16_t *magx_cal = &mgx_cal;
int16_t *magy_cal = &mgy_cal;
int16_t *magz_cal = &mgz_cal;
int i;
for ( i= 0; i < 60; i++){
mag_state = magnetometer_request_raw(mag_num, magx_cal,magy_cal,magz_cal);
float mag_alpha;
if (!mag_state){
mag_calibrated(magx_cal,magy_cal,magz_cal);
mag_alpha = atan2(mgy_cal, mgx_cal)/ M_PI *180;
printf("mag_alpha atan2 = %f\n", mag_alpha);
}
else if (mag_state == 1){
printf("Fail because of access error, check the connection");
}
else if (mag_state == 2){
printf("Fail because of interface error, check your code");
}
Sleep(time_step);
}
switch_off_all();
return 0;
}
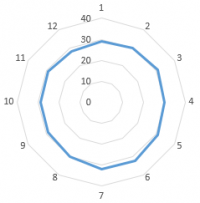
Rotate the magnetometer in 30 degree increments and record the output angle value in an EXCEL spreadsheet. You should get something like this table with data.
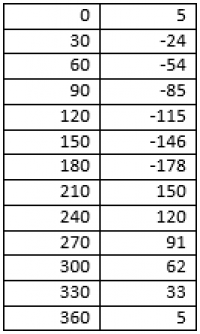
Data analysis in Excel
Analyze the data obtained as in the previous lesson.


The average value of the difference between the measured angles is 30.
The standard deviation of the calculated differences from the average value is 1.3.
The percentage ratio of the average value and the standard deviation is 4%.
The percentage measured in the last lesson was 17%, therefore, the calibrated magnetometer measures about 4 times more accurately.